RDP Server Installation
This guide provides all necessary steps to install and configure the RDP Server, which enables secure, gateway-managed remote desktop access to your assets directly from the ServiceOps UI.
The RDP Server, powered by MeshCentral, acts as the central communication gateway that facilitates secure remote desktop connections between your ServiceOps instance and the target assets. This guide provides comprehensive instructions for installing and configuring the RDP Server for on-premise deployment.
Architecture
Deployment Models
The RDP Server can be deployed in two primary configurations:
- Local Deployment: The RDP Server and the main ServiceOps Server are installed on the same machine. This is a simpler setup suitable for smaller environments.
- Remote Deployment: The RDP Server is installed on a separate, dedicated machine. This is recommended for larger environments to distribute the load and enhance security.
Communication Flow
This architecture demonstrates how ServiceOps integrates with an RDP Server to enable secure remote management of endpoints, especially for discovery and remote sessions. The flow includes on-premise deployment, secure gateway protection, DNS routing, and communication with remote users.
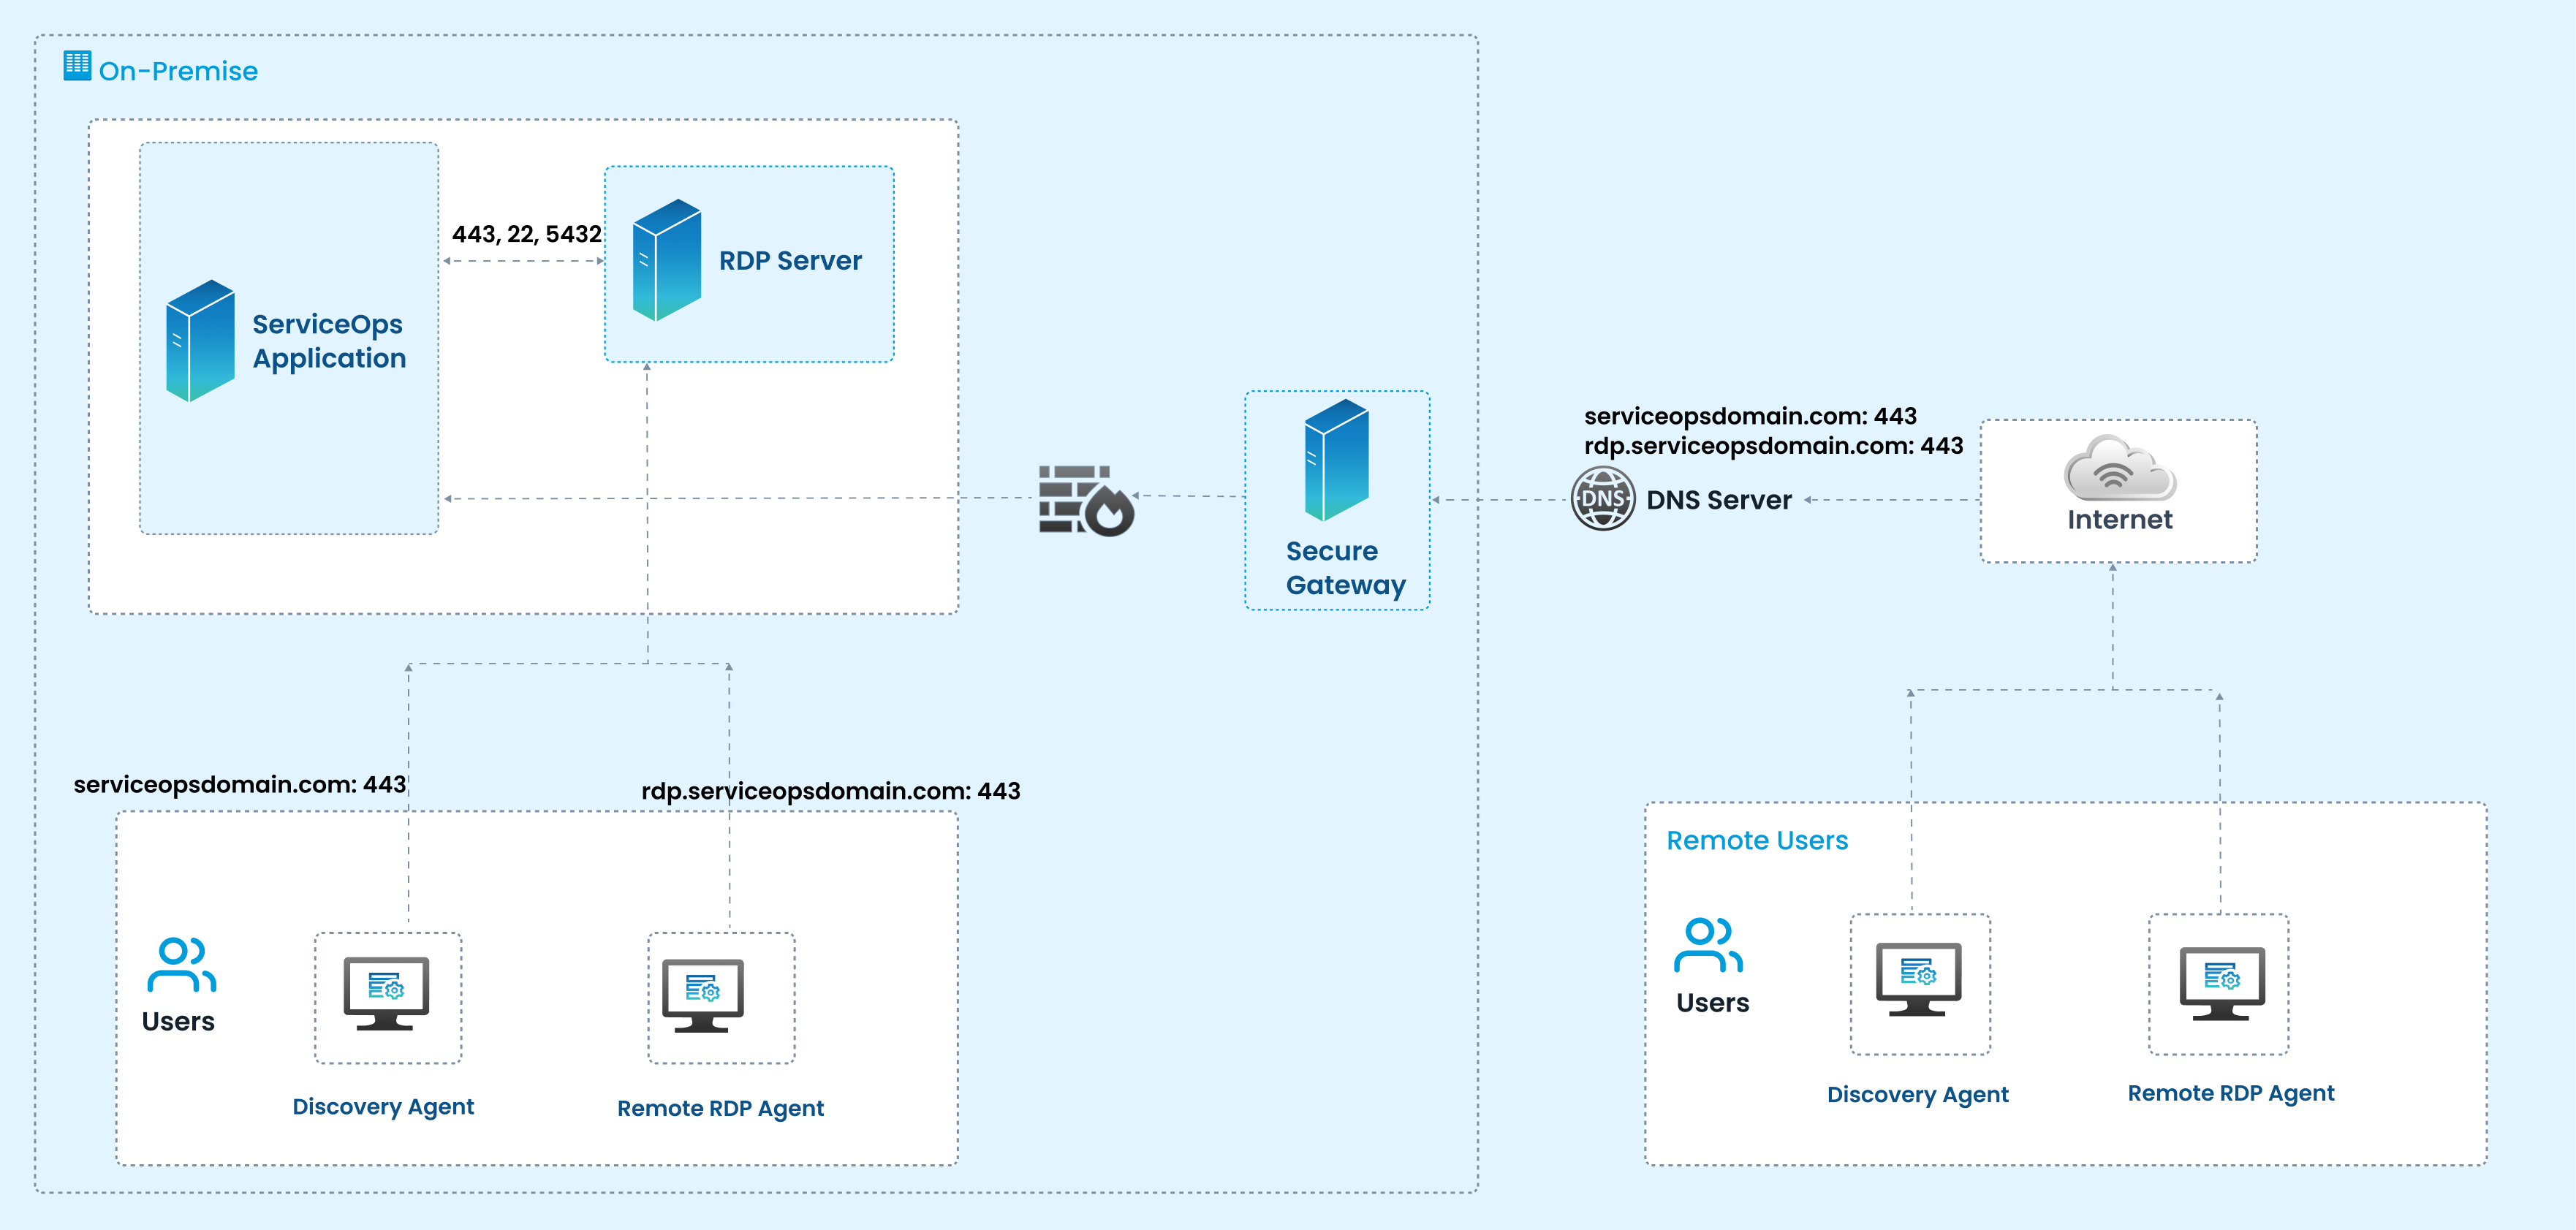
On-Premise Setup
The ServiceOps Application is deployed within the organization's data center. It communicates with the RDP Server over standard secure ports (443, 22, 5432) for session control, authentication, and data exchange. Local Users connect using either a Discovery Agent (to detect assets, configurations, and statuses) or a Remote RDP Agent (to enable remote session handling).
Secure Gateway
All traffic from the internet passes through the Secure Gateway (Firewall/Reverse Proxy). It ensures encrypted communication, enforces security policies, and prevents unauthorized access to the internal RDP and ServiceOps servers.
DNS Resolution
The DNS Server resolves domain names like:
serviceopsdomain.com:443→ Directs to the ServiceOps Applicationrdp.serviceopsdomain.com:443→ Directs to the RDP Server
These entries allow users and agents to securely reach the correct service endpoints over the internet.
Remote Access via Internet
Remote Users outside the corporate network access ServiceOps and RDP sessions through the internet. They install Discovery Agents (for endpoint inventory and updates) and Remote RDP Agents (to establish secure RDP sessions). Communication is encrypted over port 443 to ensure data privacy and compliance.
Components & Roles
On-Premise
- ServiceOps Application: Central ITSM application handling requests, workflows, and integration with RDP Server.
- RDP Server: Provides remote session hosting, allowing ServiceOps to initiate and manage RDP connections to endpoints. Communicates with ServiceOps via secure ports (443, 22, 5432).
- Local Users: Use Discovery and RDP Agents to interact with endpoints and ServiceOps.
Agents
- Discovery Agent: Collects inventory and status of endpoints.
- Remote RDP Agent: Facilitates remote desktop sessions through the RDP server.
Starting from Agent version 8.7.4, the Discovery and RDP Agents have been unified into a single agent. The separate Discovery Agent and RDP Agent guides are applicable only up to version 8.7.3.
Security & Connectivity
- Secure Gateway (Firewall/Proxy): Protects internal servers and routes secure traffic between remote users and ServiceOps/RDP servers.
- DNS Server: Resolves domain requests for ServiceOps (
serviceopsdomain.com) and RDP (rdp.serviceopsdomain.com). - Internet: Provides connectivity between remote users and on-premise infrastructure.
Remote Users
- Discovery Agent (Remote): Installed on remote endpoints to enable asset discovery and updates over the internet.
- Remote RDP Agent: Allows secure remote desktop sessions to be established via ServiceOps and the RDP server.
This architecture allows both local and remote users to securely connect to organizational resources using ServiceOps and RDP. The Secure Gateway ensures protected traffic, while DNS routing and encrypted ports (443) provide seamless and secure endpoint discovery and remote access capabilities.
Prerequisites
Before you begin the installation, ensure the following requirements are met.
System Requirements
- Operating System:
- Ubuntu 22.04 / 24.04
- Red Hat Enterprise Linux (RHEL) 9.2 / 9.4
- Permissions: Root or sudo privileges are required for installation.
Network Requirements
- Whitelisted URLs: The following URLs must be whitelisted to verify the wildcard SSL certificate during installation:
http://timestamp.comodoca.com/*http://timestamp.sectigo.com/*
- ServiceOps Server Access: The RDP server machine must be able to communicate with the main ServiceOps server's IP address.
- Database Access: If the ServiceOps database is on a separate server, the RDP server must have access to the database on port
5432. - Firewall Ports:
- Local Connection: Port
8443must be open. - Remote Connection: Port
443must be open. - Use
sudo ufw statusto check andsudo ufw allow <port>to open ports on Ubuntu.
- Local Connection: Port
- DNS / Host Entry: If the ServiceOps server is not publicly accessible via a domain name, you must add a host entry on the RDP server to map the ServiceOps IP address to its domain name.
Required Information
- ServiceOps Server IP Address: The IP address of your main ServiceOps instance.
- ServiceOps Domain Name: The fully qualified domain name (FQDN) of your ServiceOps instance.
- ServiceOps Database Password: The encrypted database password from your main ServiceOps server configuration.
- (Optional) A valid CA-signed SSL certificate and private key: Needed if you are using a CA-signed certificate for secure communication.
This document applies to Ubuntu OS v22, 24 and RedHat OS v9.2 and 9.4.
RDP Server Installation Steps
This section outlines the two methods available for installing the RDP Server, allowing you to choose the approach that best suits your deployment needs.
- Simplified Installation
- Manual Installation
This section outlines the process for installing the RDP Server using the simplified installer. The installation supports self-signed certificate generation during setup if CA-signed certificate is not available.
Starting from v8.7.4, the RDP Server must be installed using the simplified installation method instead of the manual method.
Installation Steps
Follow these steps to install the RDP Server.
Step 1: Download the Installer
- Download the latest RDP Server installer package for your operating system from the Download Links page.
Step 2: Copy the RDP Installer File
Copy the RDP installer file to the target server and place it in a directory where you have execution permissions.
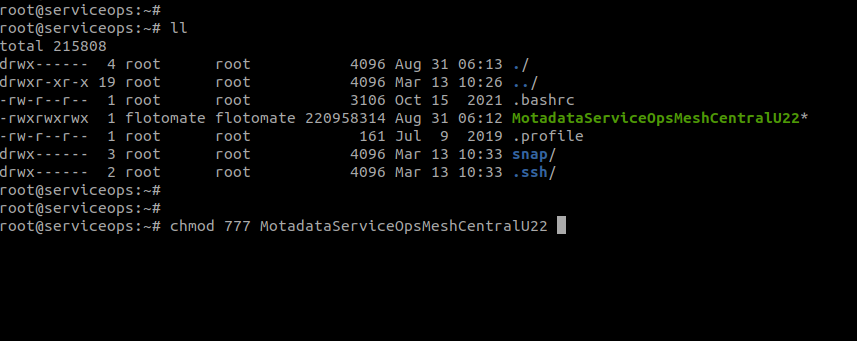
Step 3: Assign Executable Permissions
Provide executable permission to the installer file:
Syntax: chmod 777 <installer-file-name>
Example: chmod 777 MotadataMeshcentralserver

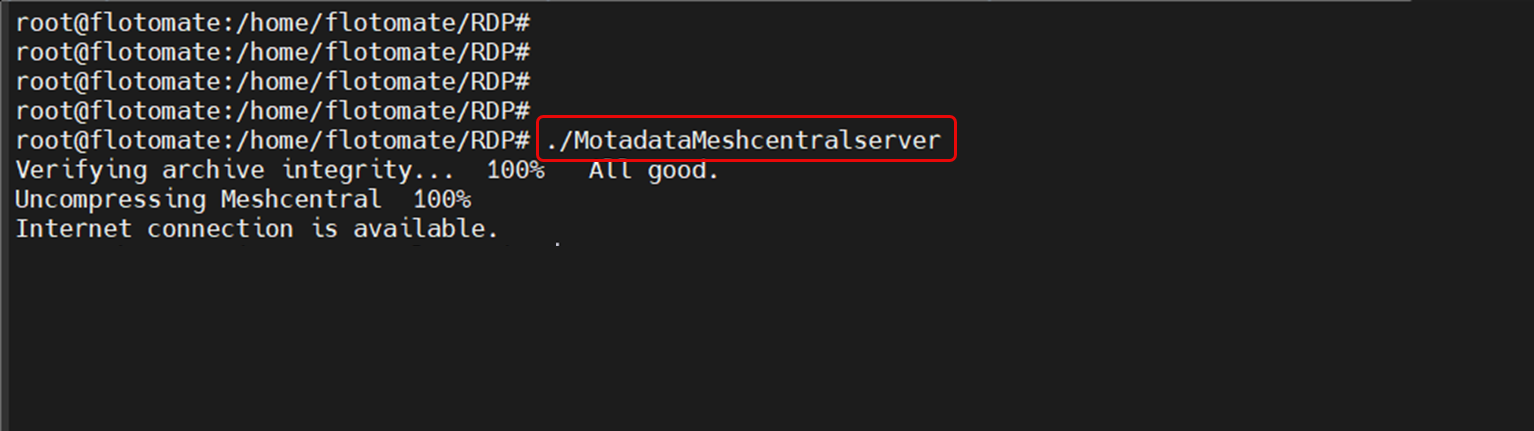
Step 4: Run the Installer
Run the installer using the following command:
Syntax: ./<installer-file-name>
Example: ./MotadataMeshcentralserver
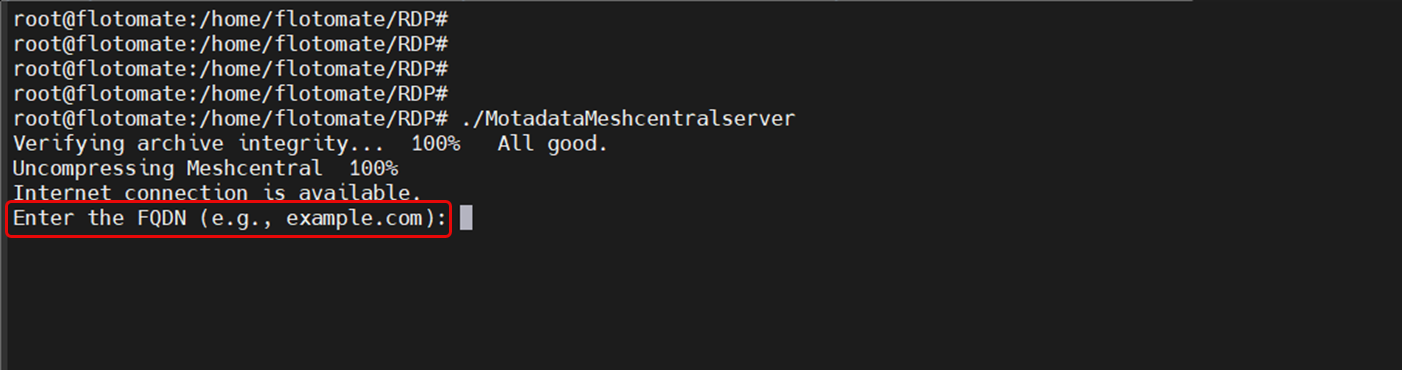
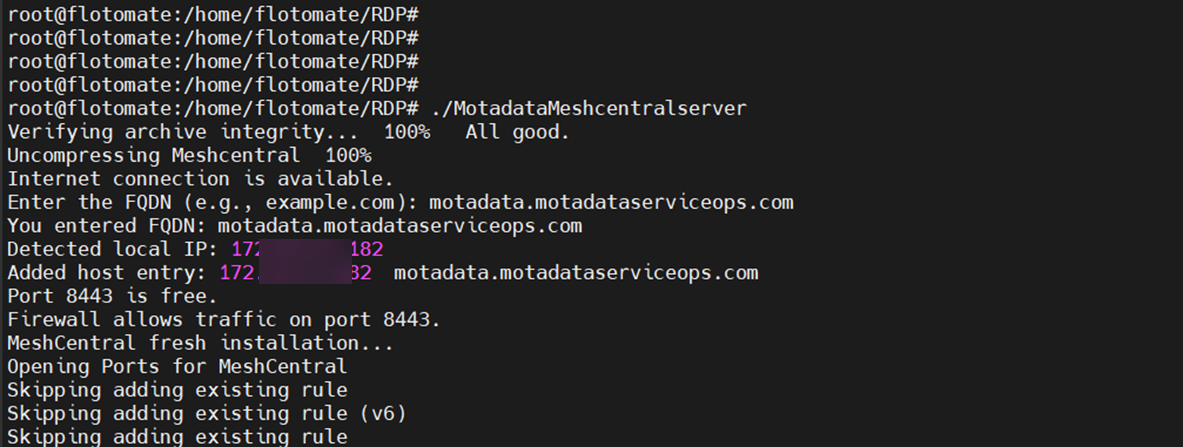
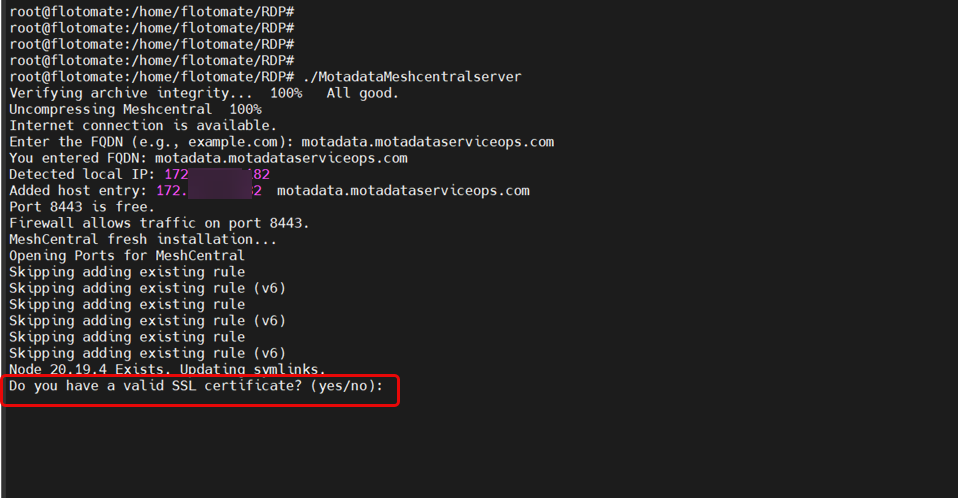
Step 5: Enter the RDP Server FQDN
When prompted, enter the Fully Qualified Domain Name (FQDN) of the RDP Server.
This FQDN is used for server configuration and certificate setup.
Step 6: Certificate Configuration
During installation, you will be prompted to specify whether a valid CA-signed certificate is available.
- CA-Signed Certificate Available
- CA-Signed Certificate Not Available
Option 1: CA-Signed Certificate Available (Select Yes)
If you have a valid CA-signed certificate:
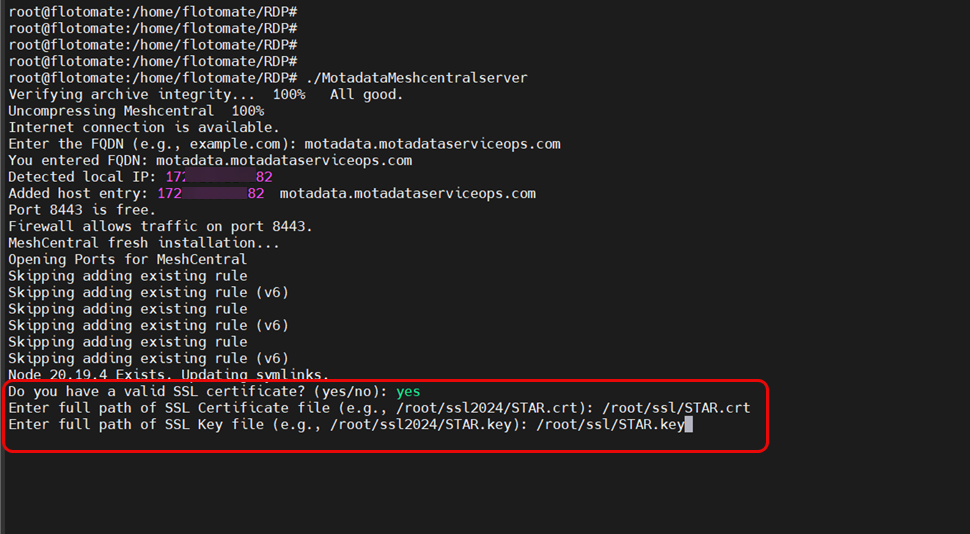
- Enter the full path to the certificate file.
- Enter the full path to the private key file.
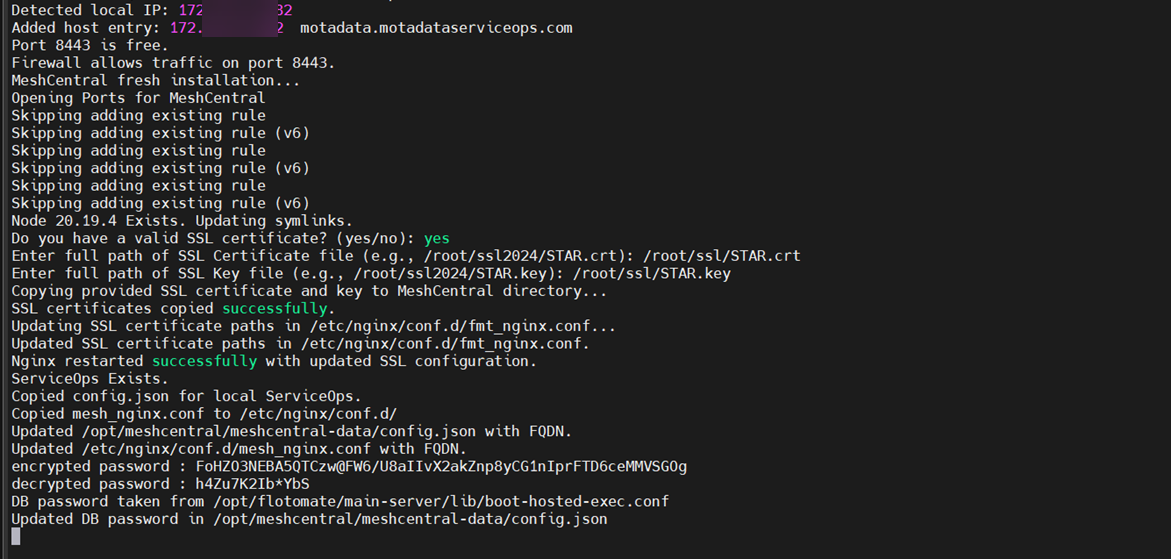
- The installer validates the certificate and continues with the installation.
Option 2: CA-Signed Certificate Not Available (Select No)
If you do not have a valid CA-signed certificate:
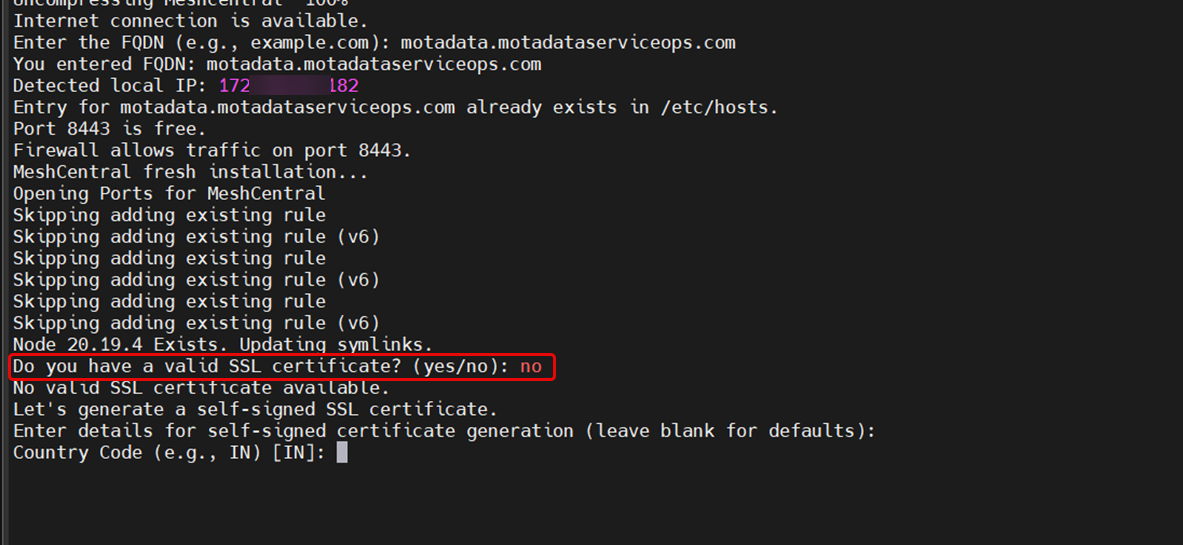
- The installer initiates the self-signed certificate generation process.
- Provide the required certificate details when prompted.
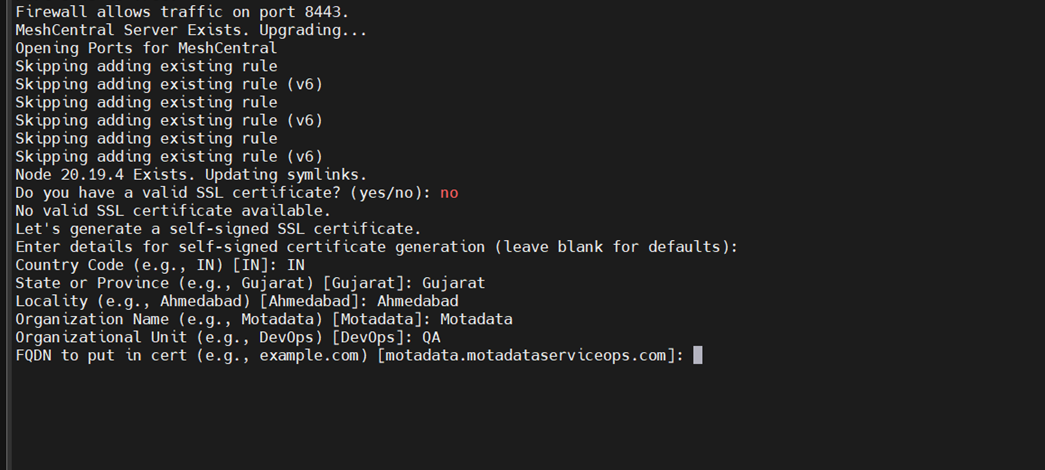
- For the FQDN in the certificate, enter the domain name for which the certificate should be generated.
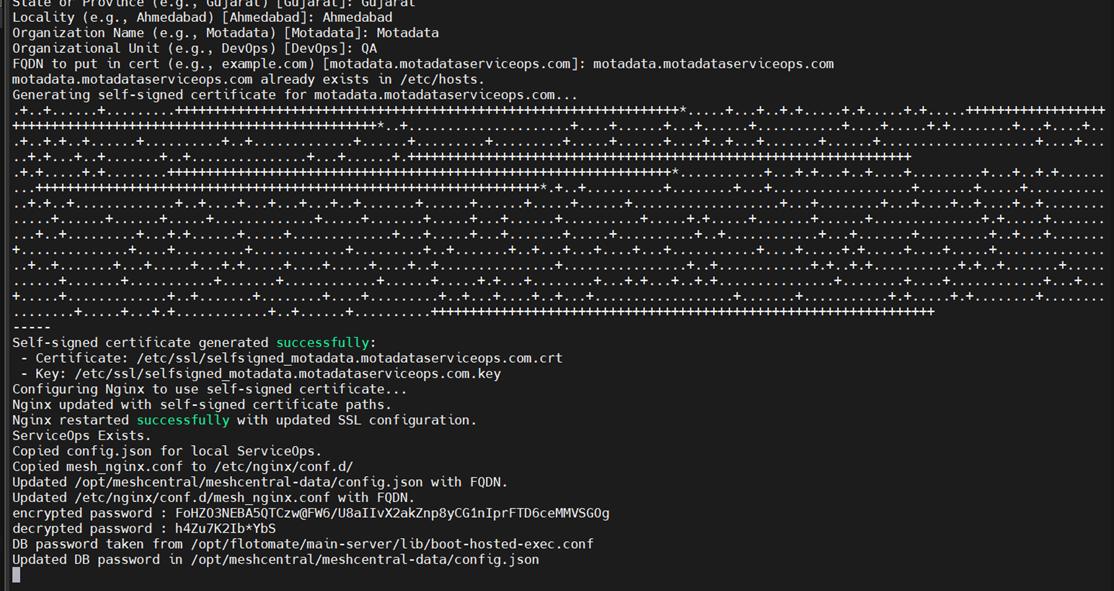
- The self-signed certificate is automatically generated.
- Installation proceeds automatically after certificate generation.
Step 7: Provide Sudo User Details
Enter the username of the sudo user that should be used to configure the RDP Server.
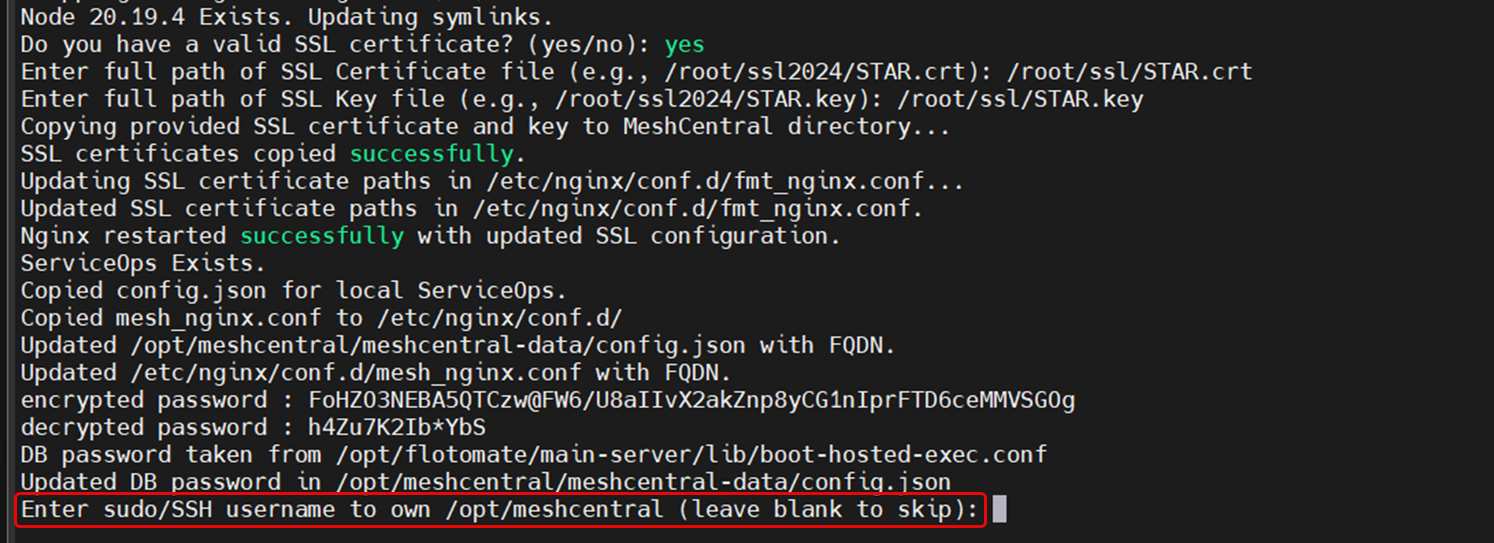
This user account will be used to complete the installation and configuration steps.
Step 8: Installation Completion
After all required inputs are provided:
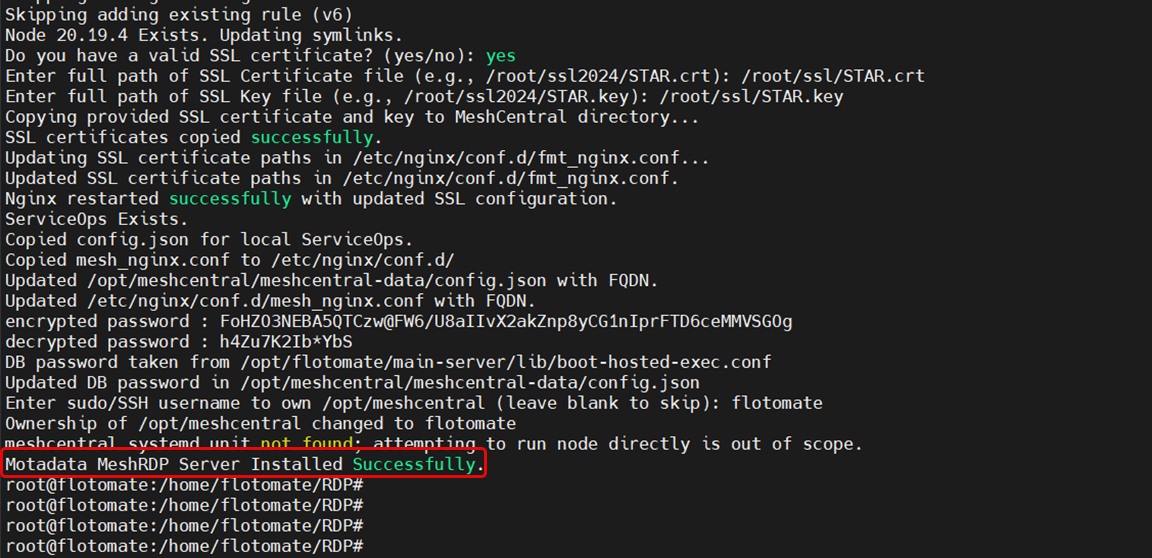
- Certificate configuration is completed.
- RDP Server installation finishes successfully.
- The RDP Server is ready for use.
Post-Installation Configuration
After a successful installation, you may need to perform additional configurations to tailor the RDP server to your environment.
Port Configuration
Port Configuration
To change the default listening port of the RDP server, you must edit configuration files for MeshCentral and Nginx, update your firewall, and finally update the port in the ServiceOps UI.
The following example shows how to change the port to 8089.
1. Update the RDP Server's Config File (config.json)
Navigate to the MeshCentral data directory:
cd /opt/meshcentral/meshcentral-data/Open the
config.jsonfile for editing.Add or modify the
"port"key to specify your desired port.json
"port": 8089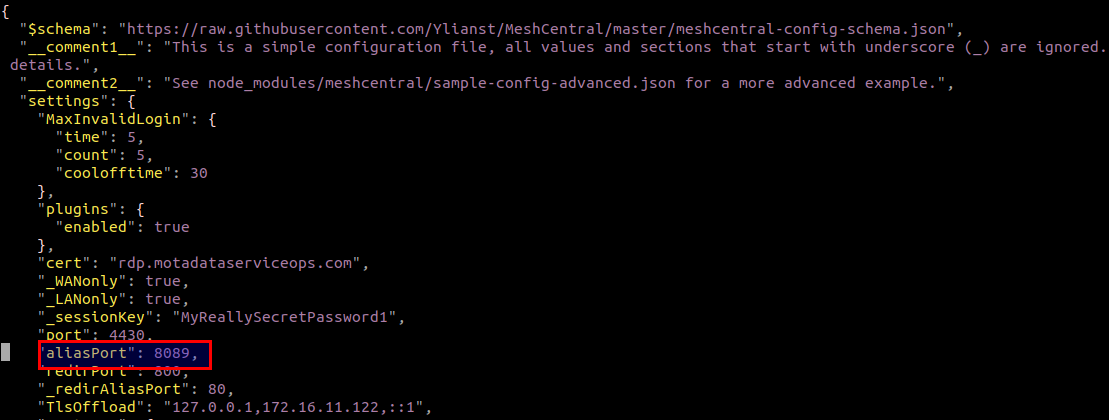
Save and close the file.
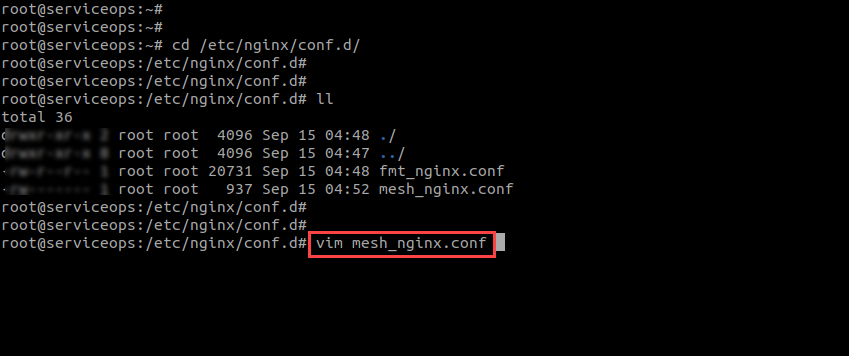
2. Update the RDP Nginx Config File (mesh_nginx.conf)
Navigate to the Nginx configuration directory:
cd /etc/nginx/conf.d/Open the
mesh_nginx.conffile for editing.Locate the
listendirective and change the port number to match the port you set inconfig.json(e.g.,8089). The default is8443.nginx
listen 8089;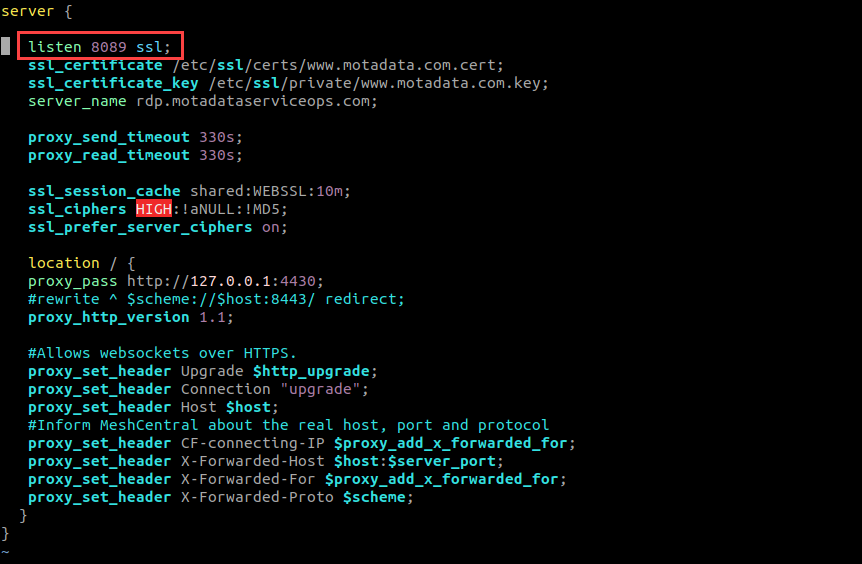
Save and close the file.
3. Configure ServiceOps Reverse Proxy (fmt_nginx.conf) [Local Deployments Only]
If your RDP Server is installed on the same machine as ServiceOps, you must update the main Nginx reverse proxy configuration.
In the
/etc/nginx/conf.d/directory, open thefmt_nginx.conffile for editing.Locate the
locationblock that forwards traffic to the RDP server (theproxy_passwill point to the old port).Update the port in the
proxy_passURL to your new port number. For example, changeproxy_pass https://localhost:8443;toproxy_pass https://localhost:8089;.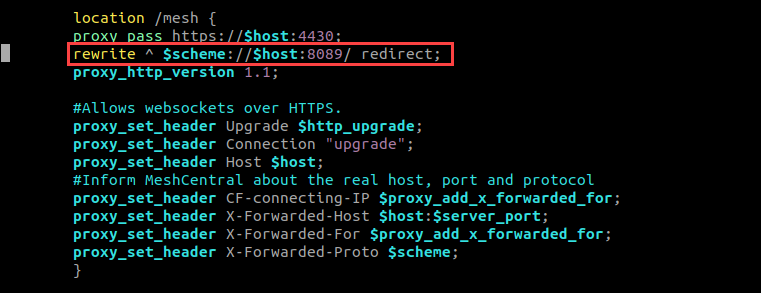
Save and close the file.
This step is only required for local deployments where ServiceOps and the RDP Server share the same Nginx instance.
4. Update Firewall Rules
Open the new port in your firewall. For example, on Ubuntu:
sudo ufw allow 8089
5. Restart Services
Restart both Nginx and MeshCentral to apply all changes.
```
sudo systemctl restart nginx
sudo systemctl restart meshcentral.service
```
6. Update Port in ServiceOps UI
Finally, inform ServiceOps of the new port number.
- Log in to your ServiceOps technician portal.
- Navigate to Admin > Asset Management > RDP Configurations.
- Update the Port field to the new port number (e.g.,
8089). - Save the configuration.
This section provides detailed instructions for manually installing the RDP Server. This method offers greater control over the installation process, including prerequisites, downloading the installer, configuring host entries, running the installation, and verifying the setup.
Installation Steps
Follow these steps to install the RDP Server.
Step 1: Download the Installer
- Download the latest RDP Server installer package for your operating system from the Download Links page.
Step 2: Prepare the Installer
- Place the downloaded installer file on your target Linux machine.
- Open a terminal and navigate to the directory containing the installer.
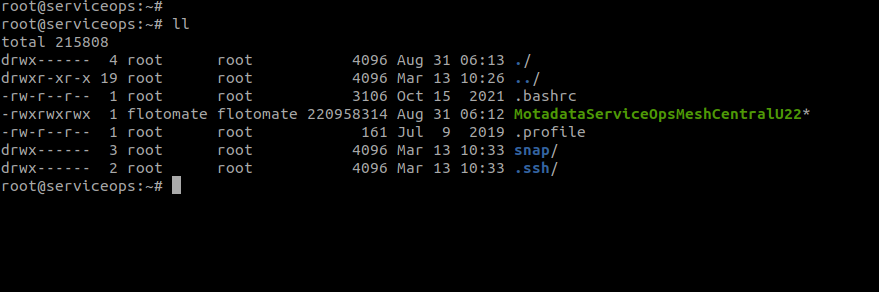
Assign execute permissions to the installer file using the
chmodcommand.chmod 777 MotadataServiceOpsMeshCentralU22
The installer filename (MotadataServiceOpsMeshCentralU22) is used as an example. You should use the specific filename you downloaded for your operating system.
Step 3: Configure Host Entry (If Required)
If your ServiceOps server is not publicly accessible via DNS, add a host entry on the RDP server machine.
Execute the following command, replacing the IP address and domain name with your ServiceOps server details:
Syntax:
echo "IPADDRESS DOMAINNAME" >> /etc/hostsExample:
echo "172.16.12.83 rdp.motadataserviceops.com" >> /etc/hostsnoteEnsure you have the Domain name.

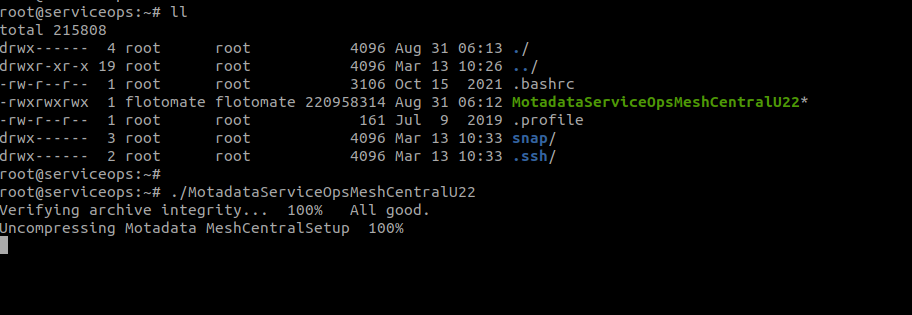
Step 4: Run the Installer
Execute the installer script with root privileges.
sudo ./MotadataServiceOpsMeshCentralU22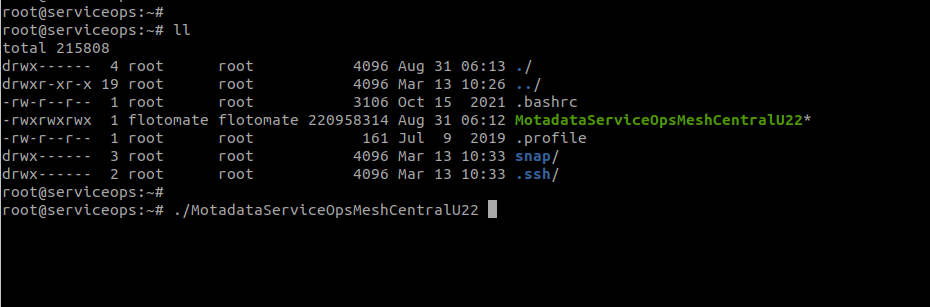
The installer will begin the setup process.
Step 5: Provide Server Details
ServiceOps Server IP: When prompted, enter the IP address of your main ServiceOps server. This is only required for remote deployments i.e. when the RDP Server and the ServiceOps Server are installed on different machines.

- The IP Address is not asked, if the RDP Server and ServiceOps Server are installed on the same machine.
- Avoid installing the Nginx server on the remote machine that hosts the RDP server.
ServiceOps Database Password: When prompted, enter the encrypted database password.
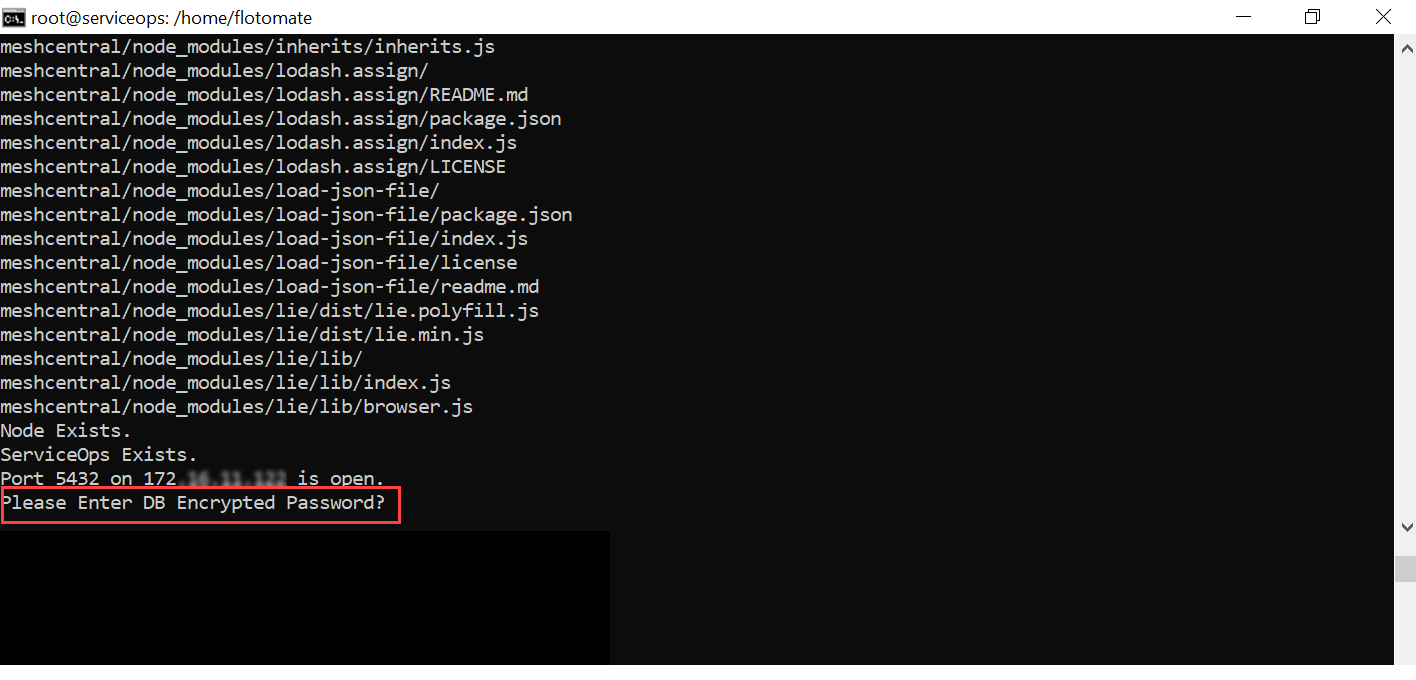
To retrieve the encrypted password:
a. SSH into your main ServiceOps server.
b. Navigate to the directory:
cd /opt/flotomate/main-server/lib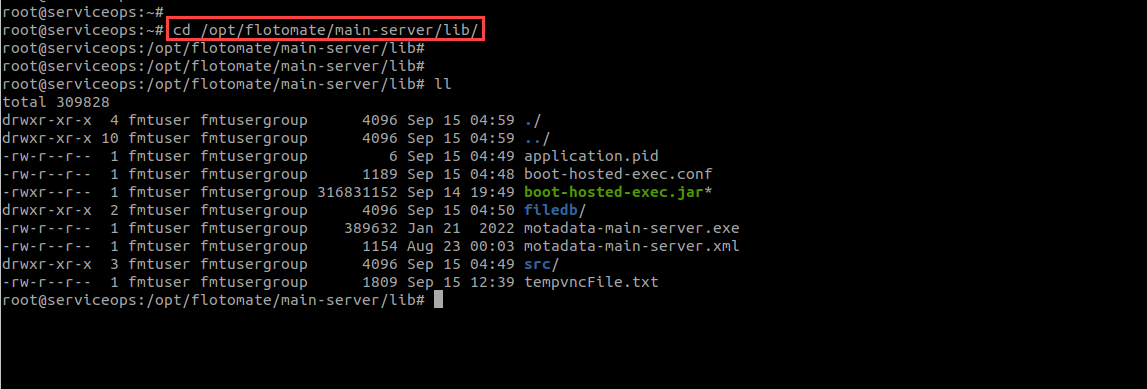
c. Run the command:
cat boot-hosted-exec.conf | grep DB_PASSWORD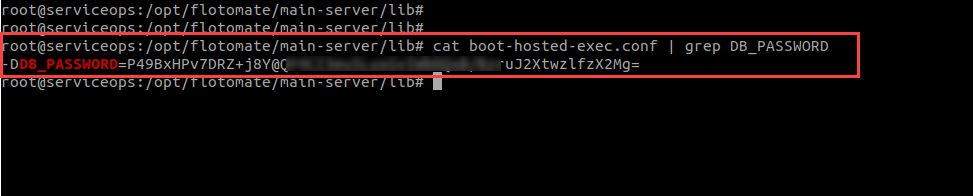
d. Copy and paste the password into the installer prompt.
The installation may take up to 5 minutes to complete.
Step 6: Verify the Installation
Once the installation is complete, check the status of the MeshCentral service to ensure it is running correctly.
sudo systemctl status meshcentral.serviceYou should see an "active (running)" status.
Set the correct ownership for the
meshcentraldirectory. Navigate to/opt/and run the following command, replacing<user>and<group>with the appropriate values for your system (e.g.,flotomate:flotomate).sudo chown -R <user>:<group> /opt/meshcentral
The <user> should be the backend user configured in the RDP configuration in the user interface.
Post-Installation Configuration
After a successful installation, you may need to perform additional configurations to tailor the RDP server to your environment.
Domain Name/SSL Certificate Configuration
Domain Name Configuration
To align the RDP server with your organization's domain, you need to update the domain name in three locations: mesh_nginx.conf, /etc/hosts, and config.json.
1. Update Nginx Configuration
- Navigate to
/etc/nginx/conf.d/.
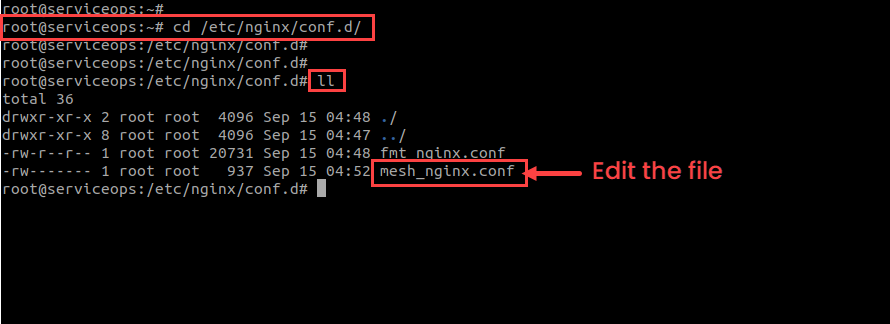
- Open the
mesh_nginx.conffile for editing.sudo vim /etc/nginx/conf.d/mesh_nginx.conf
- Locate the
server_namedirective and replace the default domain (rdp.motadataserviceops.com) with your desired domain.
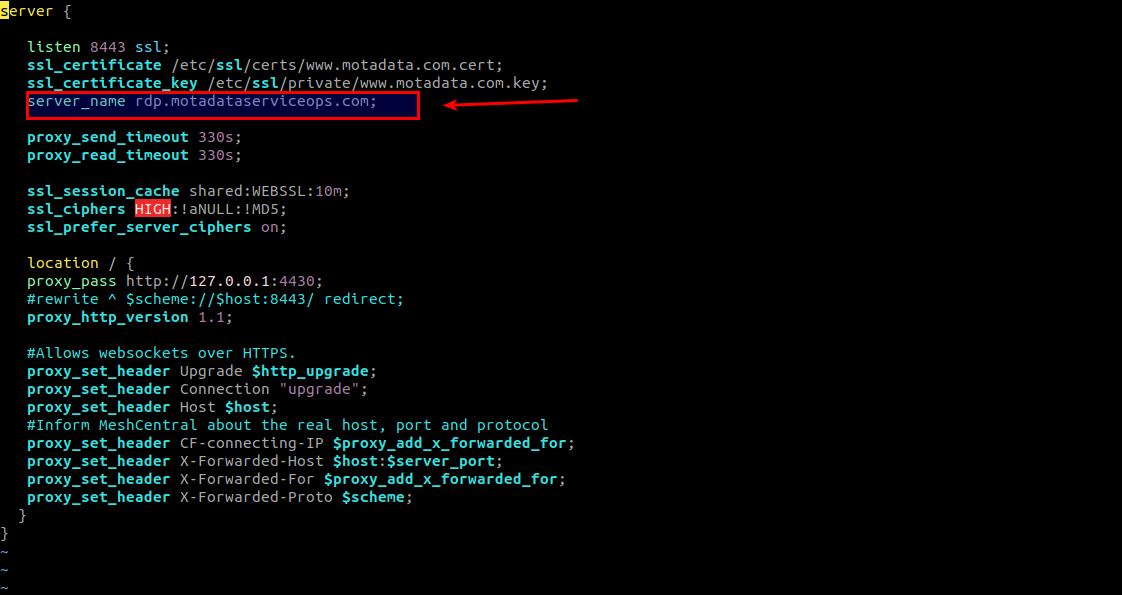
For example, rdp.example.com.
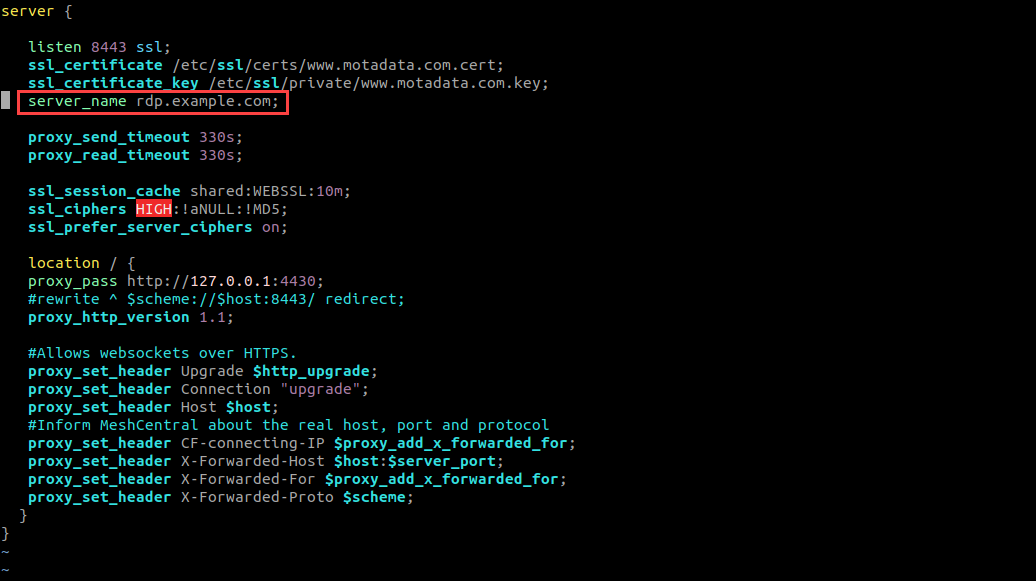
- Save the file and exit using the
:wq!command.
To replicate the changes, restart the nginx service whenever any changes are made in the nginx.conf file.
2. Update Host File
- Open the
/etc/hostsfile.vim hosts
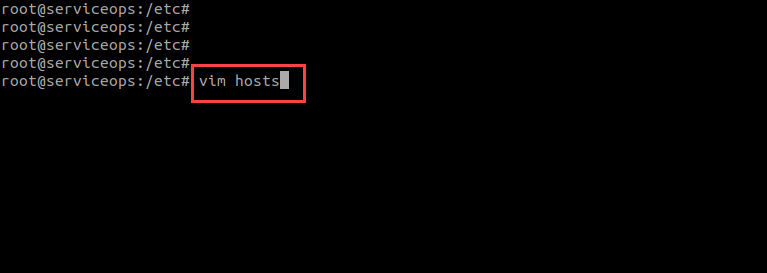
- Update the domain host name and also add the server IP Address before it, as shown below.
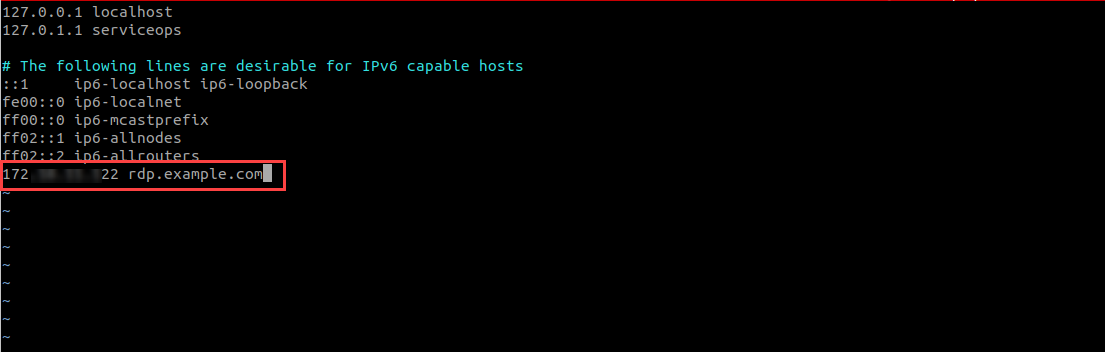
- Save the file and exit.
3. Update RDP Server Config
- Navigate to
/opt/meshcentral/meshcentral-data/.
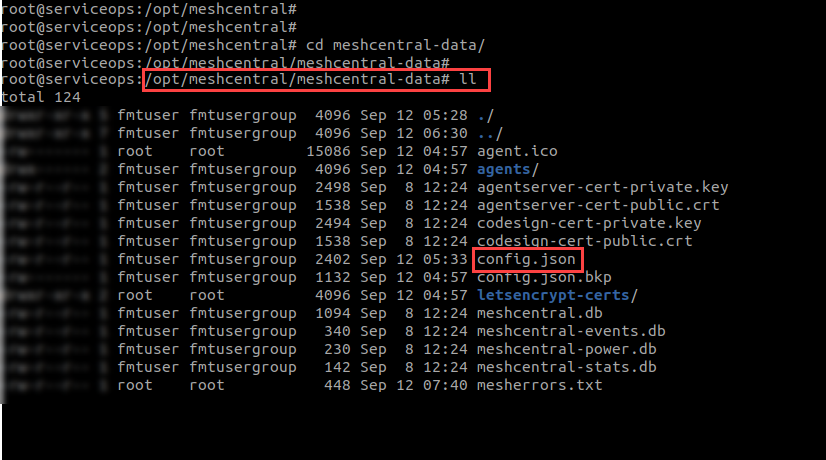
- Open the
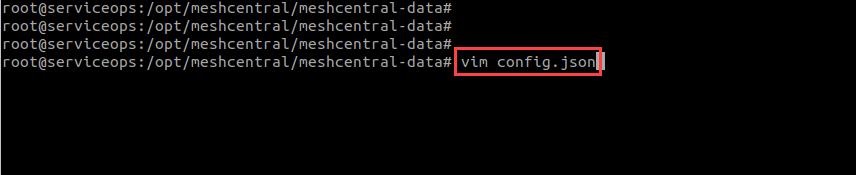
config.jsonfile.vim config.json
- Update the
domainskey with your new domain name in the config file.
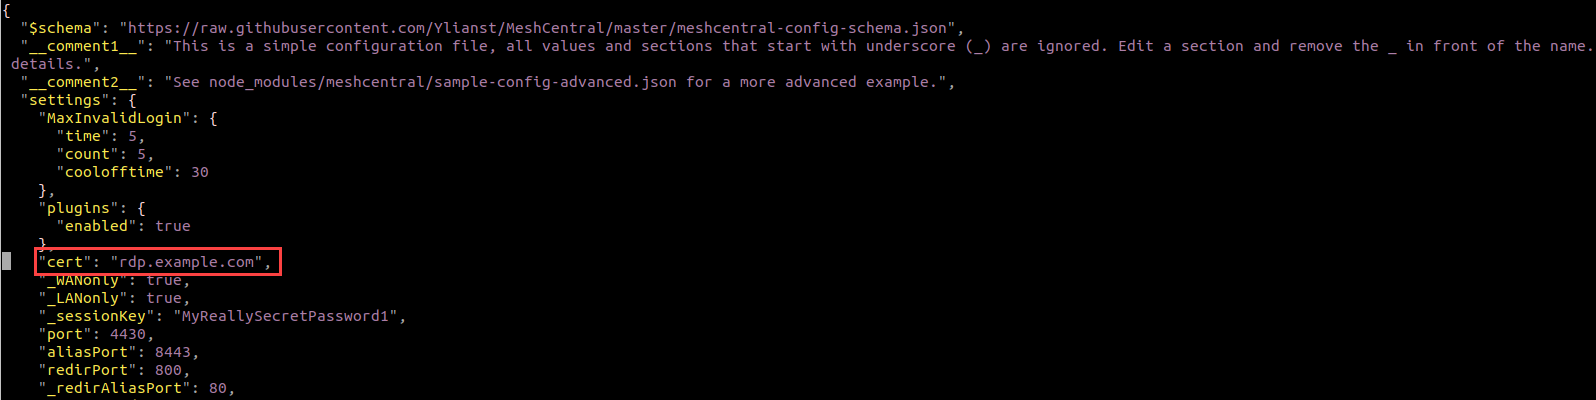
In the
letsencryptsection, update theemailanddomainskeys to match your new configuration.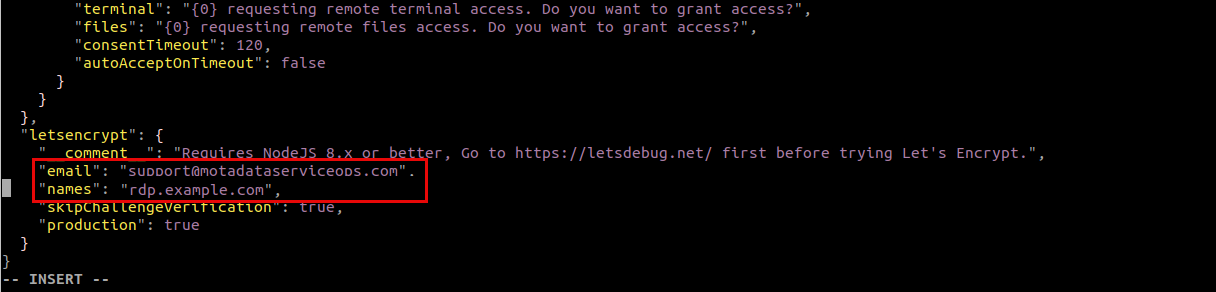
Save the file and exit using the
:wq!command.
SSL Certificate Configuration
MeshCentral provides remote desktop functionality and requires SSL configuration for secure connections.
1. Stop MeshCentral Service
Check the current service status:
sudo systemctl status meshcentralStop the service:
sudo systemctl stop meshcentral
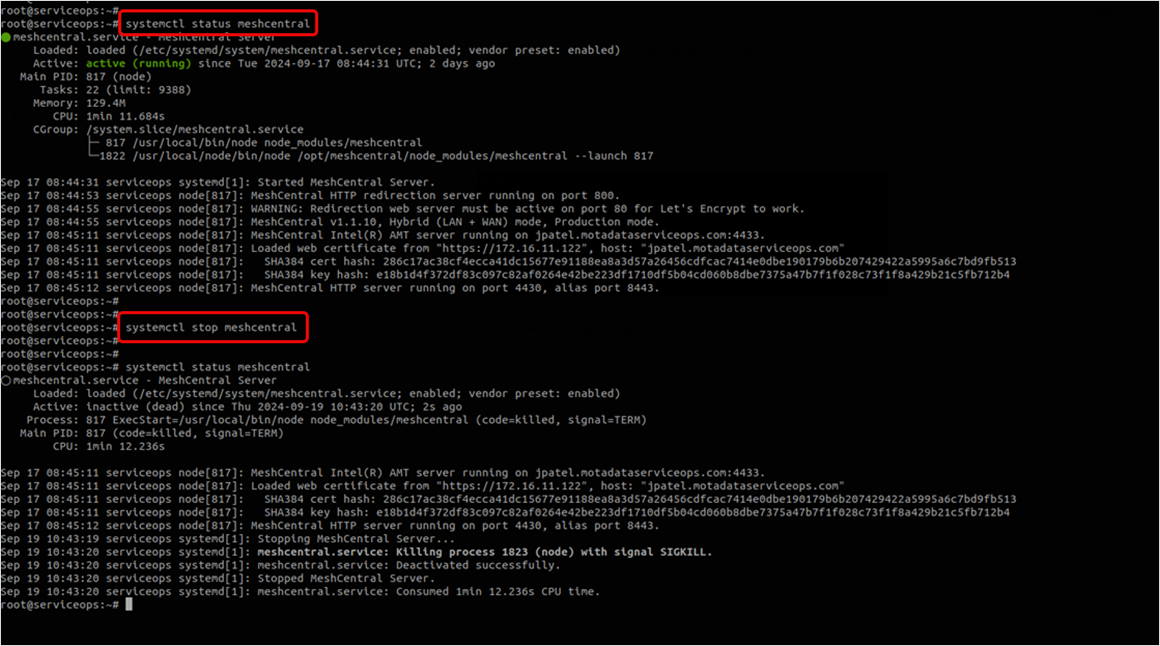
Once the service is stopped, verify its status using the above command again.
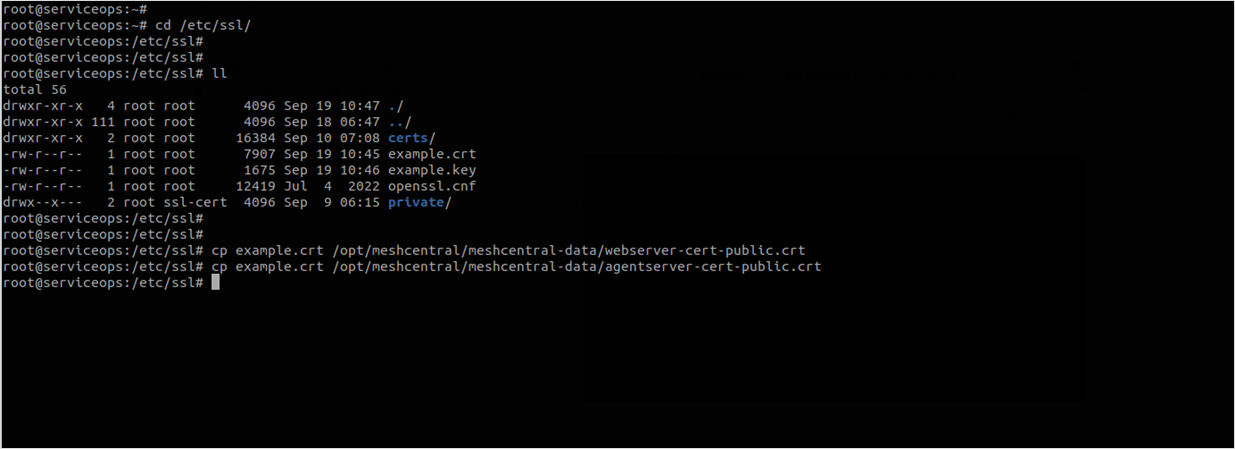
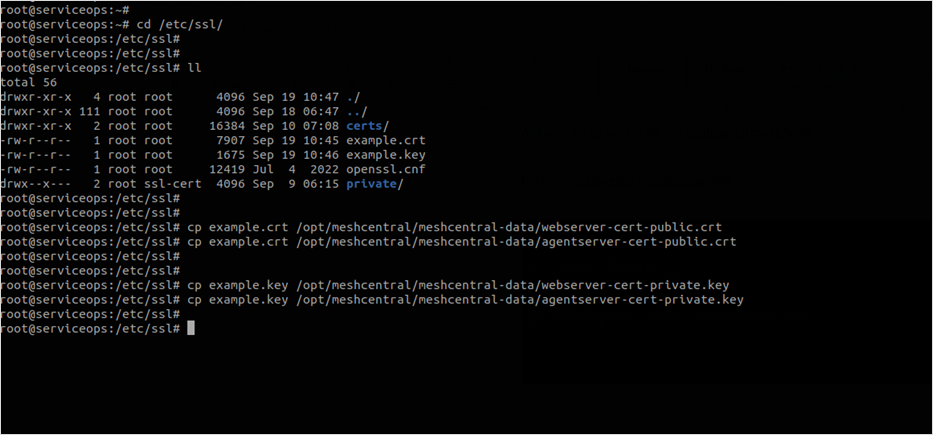
Next, download or transfer the valid SSL certificate file into the meshcentral server and go to the file path " /etc/ssl/ ".
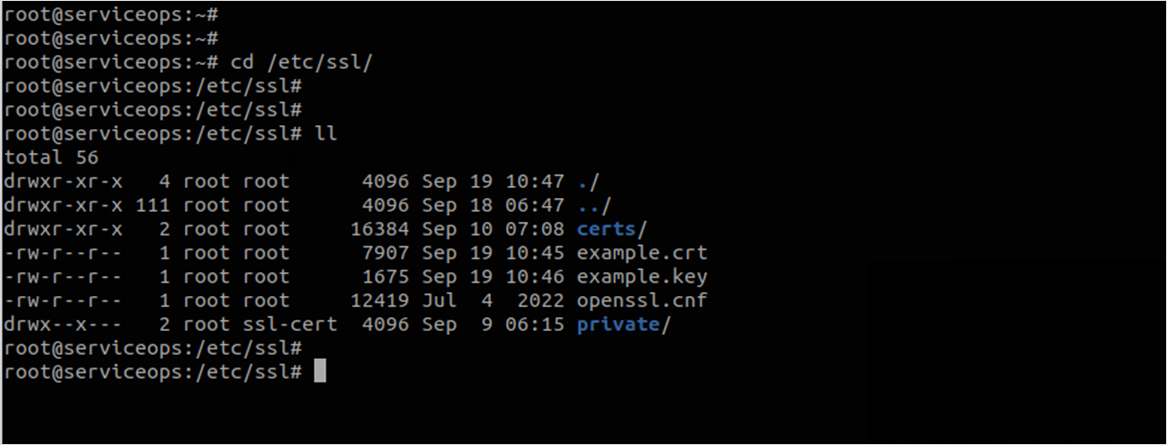
2. Prepare Certificate Files
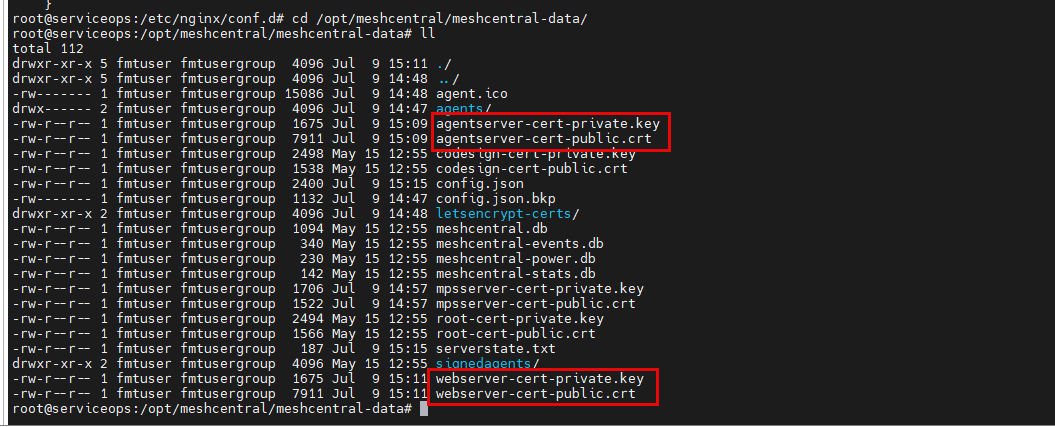
- Copy certificate files to the MeshCentral data directory:
sudo cp example.crt /opt/meshcentral/meshcentral-data/webserver-cert-public.crt
sudo cp example.crt /opt/meshcentral/meshcentral-data/agentserver-cert-public.crt
- Copy private key files:
sudo cp example.key /opt/meshcentral/meshcentral-data/webserver-cert-private.key
sudo cp example.key /opt/meshcentral/meshcentral-data/agentserver-cert-private.key
Set Proper Permissions
- Set ownership and permissions:
sudo chown meshcentral:meshcentral /opt/meshcentral/meshcentral-data/*.crt
sudo chown meshcentral:meshcentral /opt/meshcentral/meshcentral-data/*.key
sudo chmod 644 /opt/meshcentral/meshcentral-data/*.crt
sudo chmod 600 /opt/meshcentral/meshcentral-data/*.key
3. Configure MeshCentral SSL
Access MeshCentral configuration:
vi /opt/meshcentral/meshcentral-data/config.json
# or
nano /opt/meshcentral/meshcentral-data/config.json
Add SSL configuration to the config.json file:
{
  "settings": {
    "cert": "/opt/meshcentral/meshcentral-data/webserver-cert-public.crt",
    "key": "/opt/meshcentral/meshcentral-data/webserver-cert-private.key",
    "agentCert": "/opt/meshcentral/meshcentral-data/agentserver-cert-public.crt",
    "agentKey": "/opt/meshcentral/meshcentral-data/agentserver-cert-private.key"
  }
}
4. Start MeshCentral Service
Start MeshCentral service:
systemctl start meshcentral
Verify service status:
systemctl status meshcentral
Check MeshCentral logs:
journalctl -u meshcentral -f
- Once the cert and key files are copied into the meshcentral config folder, ensure that the ssl cert files on the meshcentral config folder have the required user ownership and permission.
- Ensure the meshcentral nginx ssl file path is proper. Kindly verify once you start using meshcentral server services.
Port Configuration
Port Configuration
To change the default listening port of the RDP server, you must edit configuration files for MeshCentral and Nginx, update your firewall, and finally update the port in the ServiceOps UI.
The following example shows how to change the port to 8089.
1. Update the RDP Server's Config File (config.json)
Navigate to the MeshCentral data directory:
cd /opt/meshcentral/meshcentral-data/Open the
config.jsonfile for editing.Add or modify the
"port"key to specify your desired port.json
"port": 8089Save and close the file.
2. Update the RDP Nginx Config File (mesh_nginx.conf)
Navigate to the Nginx configuration directory:
cd /etc/nginx/conf.d/Open the
mesh_nginx.conffile for editing.Locate the
listendirective and change the port number to match the port you set inconfig.json(e.g.,8089). The default is8443.nginx
listen 8089;Save and close the file.
3. Configure ServiceOps Reverse Proxy (fmt_nginx.conf) [Local Deployments Only]
If your RDP Server is installed on the same machine as ServiceOps, you must update the main Nginx reverse proxy configuration.
In the
/etc/nginx/conf.d/directory, open thefmt_nginx.conffile for editing.Locate the
locationblock that forwards traffic to the RDP server (theproxy_passwill point to the old port).Update the port in the
proxy_passURL to your new port number. For example, changeproxy_pass https://localhost:8443;toproxy_pass https://localhost:8089;.Save and close the file.
This step is only required for local deployments where ServiceOps and the RDP Server share the same Nginx instance.
4. Update Firewall Rules
Open the new port in your firewall. For example, on Ubuntu:
sudo ufw allow 8089
5. Restart Services
Restart both Nginx and MeshCentral to apply all changes.
```
sudo systemctl restart nginx
sudo systemctl restart meshcentral.service
```
6. Update Port in ServiceOps UI
Finally, inform ServiceOps of the new port number.
- Log in to your ServiceOps technician portal.
- Navigate to Admin > Asset Management > RDP Configurations.
- Update the Port field to the new port number (e.g.,
8089). - Save the configuration.
Applying Configuration Changes
Applying Configuration Changes
After making any changes, ensure the SSL certificate and key files are present in
/opt/meshcentral/meshcentral-data/:webserver-cert-public.crtwebserver-cert-private.keyagentserver-cert-public.crtagentserver-cert-private.key
Set the correct ownership for the data directory. Replace
<user>and<group>with the appropriate values for your system (e.g.,flotomate).chown -R fmtuser:fmtusergroup meshcentral-data
Restart the Nginx and MeshCentral services to apply all changes. Wait for approximately 30 seconds for the services to initialize.
sudo systemctl restart meshcentral.service
sudo systemctl restart nginx
Uninstallation Steps
To uninstall the RDP Server, you need to stop and disable the MeshCentral service and then remove the installation directory, as shown in the steps below:
- Login to the terminal server with root user.
- Stop the MeshCentral Service:
sudo systemctl stop meshcentral.service - Disable the Service: This prevents the service from starting up on boot.
sudo systemctl disable meshcentral.service - Remove the Service File:
sudo rm /etc/systemd/system/meshcentral.service - Remove the Installation Directory: This will delete all RDP server files and configurations.
sudo rm -rf /opt/meshcentral/ - After uninstalling the server, verify the uninstallation by navigating to the /opt folder and checking for the presence of the meshcentral folder. If the folder is not found, the uninstallation was successful.
Frequently Asked Questions
Why do we need a Wildcard Certificate?
A: An SSL/Self-Signed Certificate is required, matching the domain of the ServiceOps Nginx server.
For Example: If ServiceOps has a certificate for abc.motadataserviceops.com and RDP Server has rdp.motadataserviceops.com, a wildcard certificate (*.motadataserviceops.com) ensures both use the same SSL.
Both ServiceOps and RDP Nginx must have the same SSL Certificate.
Do we need HTTP or HTTPS?
A: Only HTTPS is required for security.
What ports need to be open on the RDP server?
A: The required ports are:
- Local Access: Port 8443
- Remote Access: Port 443
- ServiceOps DB: Port 5432
Can RDP Server be deployed On-Premise while ServiceOps is on SaaS?
A: Yes, but the customer must use a private cloud and be willing to expose its database to the public.
Is the Internet required for On-Premise setups?
A: Not necessarily. However, if an SSL certificate requires validation, Internet access is needed.
Troubleshooting
For common issues and solutions related to RDP installation and configuration, refer to the RDP Installation and Troubleshooting Guide.
Next Steps
- Configure RDP Settings in ServiceOps: After installing the server, configure the connection settings within the ServiceOps technician portal from Admin > Asset Management > RDP Configurations page.
- Install RDP Agents: Deploy the RDP agents to your target endpoints to enable remote connections. You can also install a combined discovery + RDP agent to perform discovery and enable remote connection.