OS Deployment Setup
Setup covers three tasks: installing the MotadataPXE Utility on a Windows machine, configuring the TFTP service bundled within the MotadataPXE package, and directing MotadataPXE boot requests to that machine via DHCP.
Prerequisites
- Admin access to the Windows machine that will act as your MotadataPXE boot server. See MotadataPXE Utility Installation for system requirements.
- Admin access to your network DHCP server if you use an existing DHCP server on the target subnet.
- All machines (ServiceOps server, MotadataPXE host, and target machines) connected on the same wired LAN.
MotadataPXE boot does not work over Wi-Fi. All machines must be connected via wired Ethernet during setup and deployment.
Step 1: Install the MotadataPXE Utility
Install the MotadataPXE Utility on the Windows machine that will act as your MotadataPXE boot server. See MotadataPXE Utility Installation for the full installation steps. Note the IP address of this machine before moving to Step 2.
Step 2: Configure the TFTP Server
The MotadataPXE Utility installs a TFTP server (tftpd64.exe) that serves the MotadataPXE boot files to target machines. You must configure it before any machine can PXE boot.
- Open Windows Explorer and navigate to
C:\Program Files (x86)\Motadata\PXE. - Right-click tftpd64.exe and select Run as administrator. The Tftpd64 window opens.
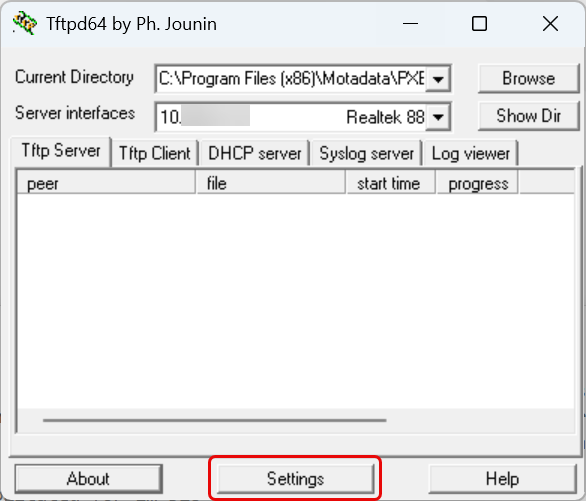
- Click Settings and the below window appears.
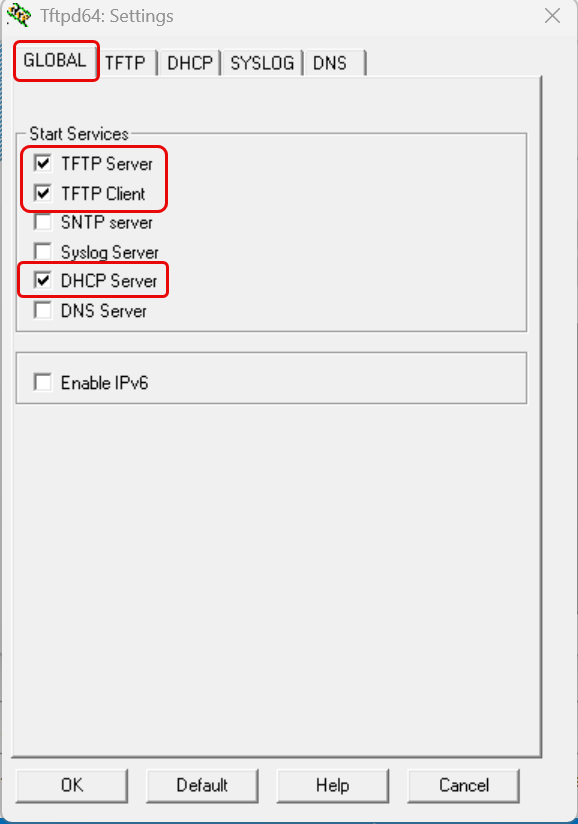
Select the Global tab and enable the following:
Setting Action TFTP Server Check to enable TFTP Client Check to enable DHCP Server Check to enable if no existing DHCP server covers the target subnet. Leave unchecked if you will configure Options 66 and 67 on your existing DHCP server in Step 3. Select the TFTP tab. Set Base Directory to:
C:\Program Files (x86)\Motadata\PXE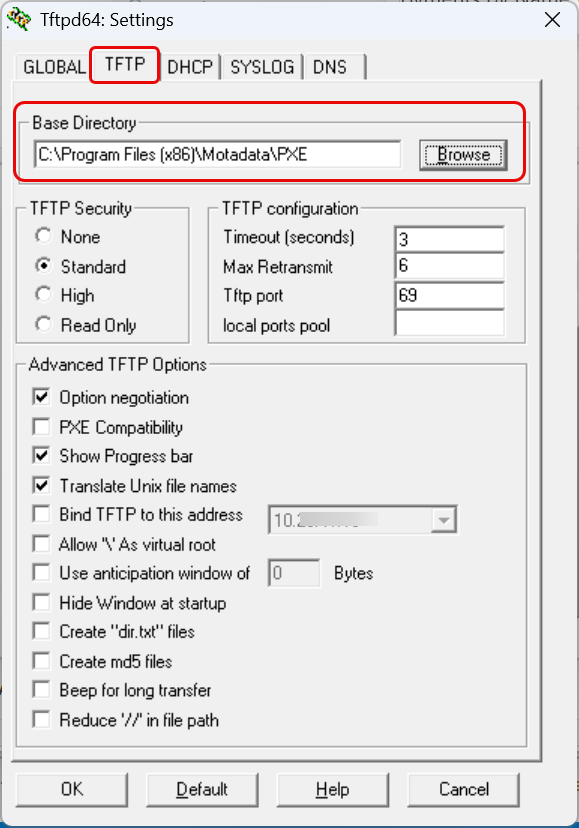
This is the folder from which
tftpd64.exeservesbootx64.efito booting machines.Select the DHCP tab. Configure the following fields if you enabled DHCP Server in the Global tab:
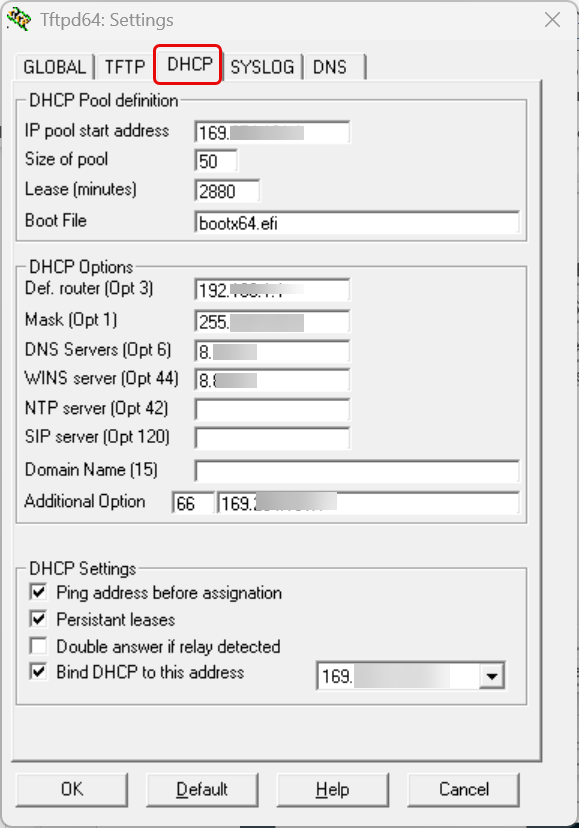
Field Description Example IP Pool Starting Address First IP address to assign to MotadataPXE-booting machines 169.254.191.1Size of Pool Number of IP addresses available for assignment 50Lease (minutes) Duration in minutes for which an IP address is leased to a booting machine 2880Boot File Boot file name served to MotadataPXE clients bootx64.efiDefault Router Gateway IP address for the subnet 192.168.1.1Mask Subnet mask 255.255.255.0DNS DNS server address 8.8.8.8Bind DHCP to Network interface on the MotadataPXE host machine 169.254.191.83Which DHCP option to useUse the built-in DHCP tab for simple environments, lab setups, or subnets without an existing DHCP server. For enterprise networks with an existing DHCP server on the same subnet, leave the DHCP Server checkbox unchecked and configure your network DHCP server in Step 3 instead. Running two DHCP servers on the same subnet causes IP conflicts.
Click Save or Apply. Keep the Tftpd64 window open. The service must remain running during deployments.
Step 3: Configure DHCP Options on Your Network DHCP Server
If your network already has a DHCP server covering the target subnet, configure it to direct MotadataPXE boot requests to the MotadataPXE machine instead of using the built-in DHCP tab in Step 2.
Configure the following options on the DHCP scope that covers your target machines:
| DHCP Option | Name | Value |
|---|---|---|
| Option 66 | Boot Server Host Name | IP address of the Windows machine running MotadataPXE or TFTP server |
| Option 67 | Bootfile Name | bootx64.efi |
After saving these options, any machine that MotadataPXE boots on that subnet contacts the MotadataPXE machine and receives bootx64.efi to start the OS Deployment process. To initiate MotadataPXE boot on a target machine, connect it via wired LAN and press F10 or F12 (varies by hardware manufacturer) during startup to open the boot menu, then select Network Boot or MotadataPXE Boot.
Apply Options 66 and 67 at the scope level rather than server level if only specific subnets should MotadataPXE boot. This prevents unintended MotadataPXE boots on segments outside your deployment target.
Best Practices
- Use wired connections only: MotadataPXE boot requires a stable wired connection. Wi-Fi is not supported.
- Dedicate the MotadataPXE server machine: Avoid running other network-intensive services on the MotadataPXE host. Contention during image transfer can stall or fail a deployment.
- Do not run two DHCP servers on the same subnet: Either use the built-in DHCP in tftpd64.exe or configure Options 66 and 67 on your existing DHCP server. Never enable both on the same subnet.
- Keep tftpd64.exe running: The TFTP server must be active during every deployment. Set it to start automatically or verify it is running before each deployment window.
- Verify reachability before deployment: From a test machine on the target subnet, ping the MotadataPXE server IP to confirm connectivity before running a full deployment.
Troubleshooting
Common issues during TFTP and DHCP setup for OS Deployment.
Target machine will not MotadataPXE boot after configuration
Cause: The DHCP server is not returning Options 66 and 67 to the booting machine, or the TFTP server is not running.
Fix:
- Confirm
tftpd64.exeis running as Administrator on the MotadataPXE host. - Verify
bootx64.efiexists inC:\Program Files (x86)\Motadata\PXE. - Check that Option 66 contains the correct IP address of the MotadataPXE or TFTP host.
- Check that Option 67 contains exactly
bootx64.efiwith no extra spaces or characters. - If using the built-in DHCP tab, confirm DHCP Server is checked in the Global tab and the correct interface is selected in the DHCP tab.
Two DHCP servers conflict on the same subnet
Cause: Both the built-in DHCP in tftpd64.exe and an existing network DHCP server are active on the same subnet. This causes IP conflicts and unpredictable MotadataPXE boot behavior.
Fix: Choose one approach. Either uncheck DHCP Server in the tftpd64.exe Global tab and configure Options 66 and 67 on your existing DHCP server, or disable DHCP on your network switch port for that subnet and use the built-in DHCP only.
OSDApp does not appear after the machine MotadataPXE boots
Cause: The TFTP base directory is incorrect, or bootx64.efi is missing from the base directory.
Fix:
- Open tftpd64.exe and confirm the TFTP tab shows
C:\Program Files (x86)\Motadata\PXEas the Base Directory. - Browse to that folder and verify
bootx64.efiis present. - Restart tftpd64.exe as Administrator if you made any changes.
Storage path not reachable when adding image in ServiceOps
Cause: The shared folder does not have Read/Write permissions, the UNC path is incorrect, or the Poller cannot reach the share.
Fix:
- Right-click the shared folder and confirm Everyone and Guest User or the Poller service account has Read/Write access.
- Verify the UNC path format:
\\hostname\sharenamewith no trailing backslash. - Confirm the Poller is running and can reach the file server over the network.